How to manage Let's Encrypt certificate on EC2 instance
In this guide, I’ll provide a short manual on how to create and manage Let’s Encrypt certificates on your EC2 instance using Lego (a Let’s Encrypt/ACME client and library written in Go). We’ll use the DNS-01 challenge, and the instance will have an appropriate IAM role so only the instance itself can manage the _acme-challenge TXT record for the domain.
Why use Let’s Encrypt on EC2?
Why even bother using Let’s Encrypt in AWS? First of all — simpler setup. You don’t need an ALB or CloudFront, which also means lower cost. Sometimes, your application isn’t something you can easily put behind a load balancer — for example, any SIP proxy. So in some cases, you’ll want Let’s Encrypt certs directly on the EC2 instance.
Why DNS-01 challenge?
If you’re running a SIP application, why open port 80 at all if you don’t need to? Or maybe port 80 is already being used by another service. Personally, I just prefer the DNS-01 challenge — fewer firewall holes to worry about.
Overview
We’ll create an instance profile and assign it to our EC2 instance so the instance itself can have permissions to add or remove DNS records, which is required for the DNS-01 challenge.
Requirements
I assume you already have an EC2 instance up and running. Here’s an example Terraform configuration to spin up a test instance:
terraform {
  required_providers {
    aws = {
      source = "hashicorp/aws"
    }
  }
}

provider "aws" {
  region  = "us-east-1"
  profile = "dev"
}

resource "aws_key_pair" "jurijs" {
  key_name   = "jurijs-key"
  public_key = "ssh-rsa AAAAB3N..."
}

resource "aws_eip" "dev" {
  instance = aws_instance.dev.id
  domain   = "vpc"
}

output "aws_eip" {
  value = aws_eip.dev.public_ip
}

output "aws_private" {
  value = aws_instance.dev.private_ip
}

resource "aws_instance" "dev" {
  ami                    = "ami-0facb4427ff2f68d4"
  instance_type          = "t2.micro"
  key_name               = aws_key_pair.jurijs.key_name
  vpc_security_group_ids = [aws_security_group.dev.id]
}

resource "aws_security_group" "dev" {
  name_prefix = "dev"
}

resource "aws_security_group_rule" "outbound" {
  security_group_id = aws_security_group.dev.id
  description       = "all-outbound-allowed"
  from_port         = 0
  to_port           = 0
  protocol          = "-1"
  type              = "egress"
  cidr_blocks       = ["0.0.0.0/0"]
}

resource "aws_security_group_rule" "SSH" {
  security_group_id = aws_security_group.dev.id
  description       = "Allow SSH from everywhere"
  from_port         = 22
  to_port           = 22
  protocol          = "tcp"
  type              = "ingress"
  cidr_blocks       = ["0.0.0.0/0"]
}
Create IAM profile for Lego
For the instance profile, you can use my Terraform module from GitHub:
https://github.com/os11k/terraform-iam-lego
Then add the following:
module "lego-iam" {
  source     = "../modules/lego-iam"
  hostname   = ["my-domain.com", "www.my-domain.com"]
  hostedzone = "7AZKFFF"
}
And make sure the EC2 instance has the IAM instance profile assigned:
resource "aws_instance" "instance-with-letsencrypt" {
  ...
  iam_instance_profile = module.lego-iam.instance-profile-name
  ...
}
Install Lego and Issue the Certificate
Install the necessary packages and issue the certificate with the following commands:
curl -s https://api.github.com/repos/go-acme/lego/releases/latest | grep "browser_download_url" | grep "linux_amd64.tar.gz" | cut -d '"' -f 4 | xargs curl -LO -#
tar xzvf lego_v*.tar.gz
install lego /usr/local/bin/

export AWS_REGION=us-east-1

/usr/local/bin/lego --accept-tos --dns route53 --email="my-gmail@gmail.com" --domains="my-domain.com" --domains="www.my-domain.com" --path="/etc/lego" run
Validate the Certificate
To verify the certificate, run:
cat /etc/lego/certificates/my-domain.com.crt
You should see output similar to:
-----BEGIN CERTIFICATE-----
MIIDxDCCA0mgAwIBAgISBrctmxC+XMJfDQGtEo89F6aaMAoGCCqGSM49BAMDMDIx
...
-----END CERTIFICATE-----

-----BEGIN CERTIFICATE-----
MIIEVzCCAj+gAwIBAgIRAIOPbGPOsTmMYgZigxXJ/d4wDQYJKoZIhvcNAQELBQAw
...
-----END CERTIFICATE-----
The first certificate is for my-domain.com and www.my-domain.com.
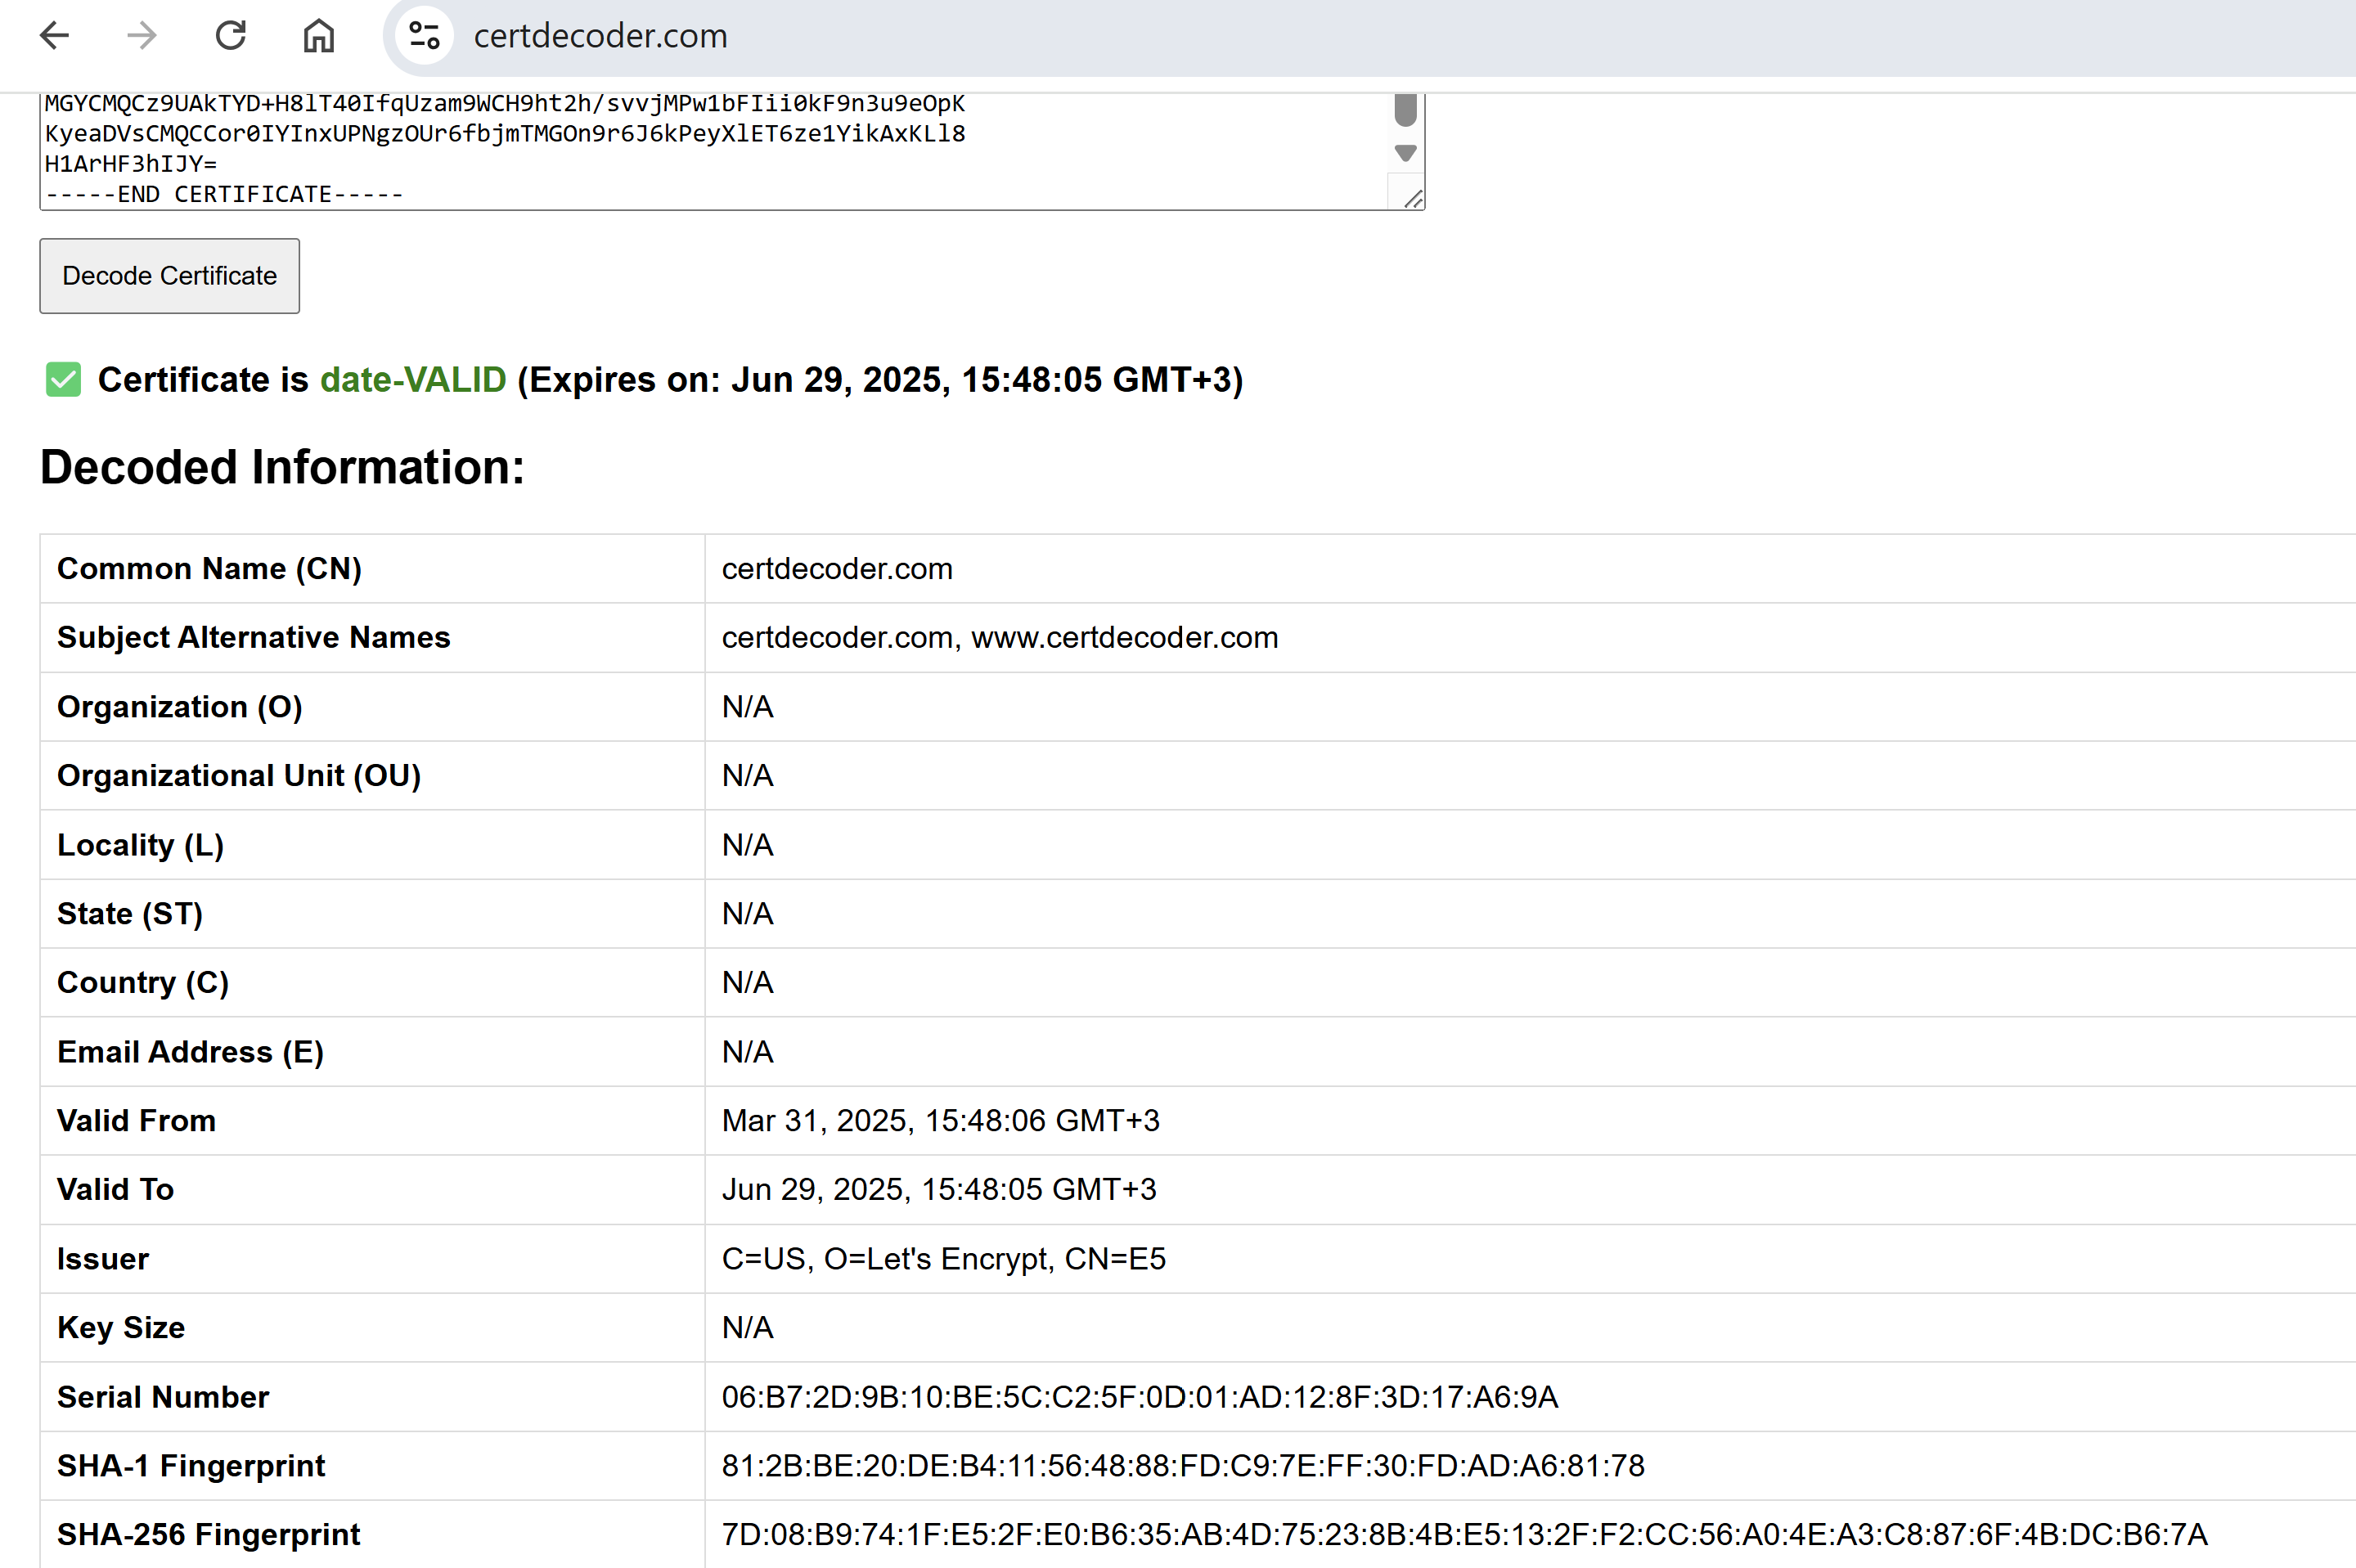
Visit https://certdecoder.com/ to verify the certificate. You should see that the Common Name is my-domain.com and the Subject Alternative Names (SANs) include both my-domain.com and www.my-domain.com.
Note: In the screenshot below, the example shows certdecoder.com instead of my-domain.com. The certificate is valid for 90 days.
The second certificate is Let’s Encrypt’s root certificate. You can inspect it if desired, though it is not essential for this guide.
Renewal via Cron
Set up a cron job for automatic renewal with these entries:
AWS_REGION=us-east-1
12 1 * * 6 /usr/local/bin/lego --dns route53 --email="my-gmail@gmail.com" --domains="my-domain.com" --domains="www.my-domain.com" --path="/etc/lego" renew >> /var/log/lego.log 2>&1
12 2 * * 6 systemctl reload nginx.service
- The first line ensures the AWS region is set.
- The second line handles the renewal process.
- The third line reloads nginx so that any new certificate is applied. (If you’re using another service like Apache or Kamailio, replace this command accordingly.)
Conclusion
You now have Let’s Encrypt set up directly on your EC2 instance using the DNS-01 challenge with the proper IAM permissions. Certificates are issued and automatically renewed via cron.
Keep an eye on /var/log/lego.log — if renewal fails, you’ll find useful details there for troubleshooting.